A recent issue is that many more of our projects have multiple engineers working on them, with the result that developers can bump into one another or have integration issues both with each other but also with the third party WordPress plugins we sometimes rely upon. At the same time there’s a number of interesting ways to scale WordPress. So we decided to kill two birds with one stone.
Continuous Integration (CI) is a programming method whereby developers on a team carry out regular commits to a branch and which can then be tested quickly and often within a realistic environment. There’s a simple reason for this – the longer it is since a developer wrote some code, the harder it gets for that developer to get back into it to correct the bugs. CI isn’t going to help you much if you work alone on standalone projects, but if you work in a team, or contribute with many others then it can be extremely useful.
In this article, I’ll walk you through the actual method on how to achieve continuous integration with WordPress, so you can build your own website within a highly scalable architecture based on Heroku.
Do remember that the article below doesn’t cover the full detail of running a scalable WordPress site with Heroku. This isn’t meant to be a beginner’s guide to anything but is aimed at people with good in-depth experience of WordPress, scaling, and web services.
Before we get started, make sure you have accounts with the following services:
WordPress Setup
We’ll use Bedrock WordPress stack as it helps you to start with the best development tools and project structure out there.
First, clone the bedrock repository or use composer to create a new folder for your project:
composer create-project roots/bedrock your-project-folder-name
Then, create a new repository on GitHub for your project and run locally:
rm -rf .git # remove the git repository if exists
git init
git add .
git commit -m “first commit”
git remote add origin https://github.com/nasyrov/wordpress-on-heroku.git
git push -u origin master
Bedrock comes with the initial preconfigured composer setup that allows you to install required plugins and themes.
Heads Up!
To install a WordPress plugin/theme available from the official WordPress repository simply run:
composer require wpackagist-plugin/<plugin-name>
composer require wpackagist-theme/<theme-name>
GitHub Flow Setup
Ideally, your master branch should always be in a working state and ready to deploy. To achieve this we will follow GitHub Flow and use branches for different features or ideas in progress.
To fully enable this feature, navigate to the “Settings” of your repository and click on the “Branches” tab. Here mark your “master” branch as a protected to disable force-pushes to this branch. Then, tick the options “Protect this branch” and “Require status checks to pass before merging”. These options will ensure that our code passes all the tests before it could be merged directly to master.
Travis CI Setup
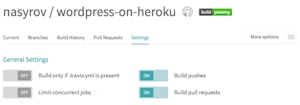
Head over to Travis CI and use your GitHub account to login. Once you are in, click on “+” icon and synchronize your website repository by flicking the switch on. Then, navigate to the settings and make sure your switch for “Build pull requests” is on as well.

Bedrock already includes “.travis.yml” file where you can describe your building and testing process for Travis CI. By default, it runs “composer test” command on a build machine in order to check whether the project follows the PSR2 coding standards.
Heads Up!
You can easily introduce PHPUnit tests in your project by tweaking your “composer.json” file:
{ "scripts": { "lint": "vendor/bin/phpcs --ignore=web/wp/,vendor/ -n -s .", "test": "phpunit" } }
Deployment Setup
Let’s continue with our configuration setup, and now we’ll work on the deployment part. We’ll be using Heroku as our hosting platform to ease the deployment and scaling process.
Since we are using GitHub Flow we are going to create a new branch where we’ll work on the deployment configuration. Open your terminal and execute the following command:
git checkout -b heroku
Next, create an “app.json” file in the root of your project with the following content:
{
  "name": "wordpress-on-heroku",
  "scripts": {
  },
  "env": {
    "AUTH_KEY": {
      "required": true
    },
    "AUTH_SALT": {
      "required": true
    },
    "JAWSDB_MARIA_URL": {
      "required": true
    },
    "LOGGED_IN_KEY": {
      "required": true
    },
    "LOGGED_IN_SALT": {
      "required": true
    },
    "MEMCACHEDCLOUD_PASSWORD": {
      "required": true
    },
    "MEMCACHEDCLOUD_SERVERS": {
      "required": true
    },
    "MEMCACHEDCLOUD_USERNAME": {
      "required": true
    },
    "NONCE_KEY": {
      "required": true
    },
    "NONCE_SALT": {
      "required": true
    },
    "SECURE_AUTH_KEY": {
      "required": true
    },
    "SECURE_AUTH_SALT": {
      "required": true
    },
    "WP_ENV": {
      "required": true
    }
  },
  "formation": {
  },
  "addons": [
  ],
  "buildpacks": [
    {
      "url": "heroku/php"
    }
  ]
}
This file is an app configuration for Heroku that indicates what kind of environment variables and build packs should be used for the deployment.
Then, create a “Procfile” in the same location (root) and place the following content:
web: vendor/bin/heroku-php-nginx web
Here we specify what kind of process types should be run on a Heroku instance. In our case, we would like to use Nginx with PHP-FPM and point our document root under the “web” folder.
Heads Up!
You can easily alter Nginx and PHP configuration by introducing your own:
web: vendor/bin/heroku-php-nginx -C config/nginx.conf -i config/php.ini web
Since our app will be run on different instances and available via different domain names, we’ll update our main config file, open config/application.php and modify your URL section with the following:
define('WP_HOME', sprintf('http://%s', $_SERVER['HTTP_HOST']));
define('WP_SITEURL', sprintf('%s/wp', WP_HOME));
Good one! Now let’s define our environment configs, make the following changes to staging & production configs:
/**
 * DB settings
 */
$url = parse_url(env('JAWSDB_MARIA_URL'));
putenv(sprintf('DB_NAME=%s', substr($url['path'], 1)));
putenv(sprintf('DB_USER=%s', $url['user']));
putenv(sprintf('DB_PASSWORD=%s', $url['pass']));
putenv(sprintf('DB_HOST=%s', $url['host']));
unset($url);

/**
 * Memcached settings
 */
define('WP_CACHE', true);
global $memcached_servers, $memcached_username, $memcached_password;
$memcached_servers  = array_map(function ($server) {
    return explode(':', $server, 2);
}, explode(',', env('MEMCACHEDCLOUD_SERVERS')));
$memcached_username = env('MEMCACHEDCLOUD_USERNAME');
$memcached_password = env('MEMCACHEDCLOUD_PASSWORD');
Finally, add your tweaks to repo and commit your changes:
git add app.json Procfile config/application.php config/environments/staging.php config/environments/production.php
git commit -m "Add Heroku configs”
git push origin heroku
Now, go back to GitHub and create a new pull request, you will probably have a highlight on top about your recent push, so you can click “Compare & pull request”. Here you can leave a detailed description for your colleagues that indicates your changes. After clicking “Create pull request” you will see that GitHub has triggered our Travis CI integration and if everything is ok and all your checks have passed you will be able to merge your changes with the master branch by clicking “Merge pull request” button.
Heroku Setup
Finally, login to your Heroku account and you will end on the main Dashboard, click “New” button on your right and select “Create new app”.
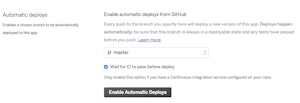
Type in your app name and select the runtime region. After you’ve created your app click on “Deploy” tab and connect it to your GitHub repository. Enable automatic deploys from GitHub by selecting your master branch and tick the option “Wait for CI to pass before deploy”.

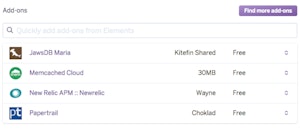
Next, navigate to “Resources” tab and add the following add-ons:
- JawsDB Maria (required)
- Memcached Cloud (optional)
- New Relic APM (optional)
- Papertrail (optional)

Well done! Head back to the deploy section and click on “New Pipeline”, type in the name of your pipeline and hit create button. By default, our app lands under the production section, so you will have to move it to the staging section by clicking the icon near the app name and selecting “move to staging”.
Once you are done, click “Enable Review Apps” under “Review Apps” section. Here, tick “Create new review apps for new pull request automatically” and make sure it inherits the configuration from your staging environment.
Click on your staging app and navigate back to the “Settings” tab, click on “Reveal Config Vars” and add the following variables: WP_ENV -> staging, AUTH_KEY, SECURE_AUTH_KEY etc. You can copy the rest of them from here.
Finally, head back to the Heroku Dashboard and create a new app, this time it will be our real production app. Add it to the existing pipeline and provision with the same add-ons. Don’t forget to add necessary config variables and indicate this time that WP_ENV is production.
An important thing, the actual production deployment is done manually, you will have to click “Promote to production” button near the staging app in order to move your change to live. I guess that a precaution matter before touching the live app.
We are done here with our Heroku setup, and our pipeline should look like on the following image.

Bottom Line
Wow, seems like a lot of work done to this point. But notice we haven’t touched any server configuration and didn’t mess with that to setup our continuous integration. Everything is now going through our GitHub status checks (tests) before the actual deployment.
Voila! When you create a branch in your repository project, Heroku will automatically create a review app where you can try your new ideas. Changes you make on a branch affect neither staging or production environments, so you’re free to experiment and commit your changes. When it’s ready, simply merge your pull request with the master branch and Heroku will promote your changes to the staging environment.


